
Live online classes are a tremendous enrichment for the variety of offerings in the fitness industry. Whether it’s yoga, Pilates, CrossFit, dance, or fitness, it makes sense to include online classes as a supplement to your offering. They provide more flexibility for your customers and give your studio more security.
Want to create an online class? Then read on to learn how to create and run an online class with FitogramPro.
1. Create an online class in FitogramPro
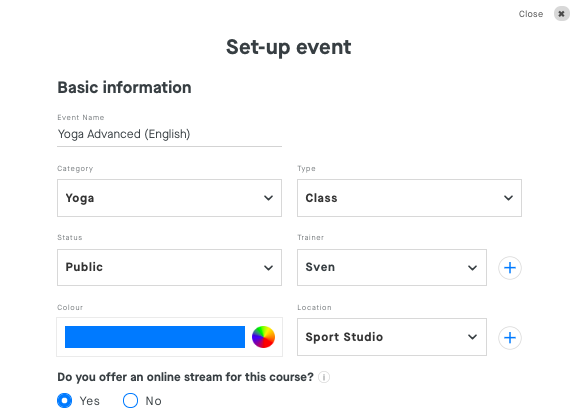
To run online classes, you must first create a new event in FitogramPro. Make sure your event is recognized as an online class. You can do this by answering the question if you offer an online stream for this course with “Yes”. You do not need to mention in the title that it is an online class, this will be displayed automatically.
Important: The field ‘Location’ should be specified as usual – your studio locations address. To make it easier for your customers, describe how the class is going to happen and how they can join you. Also, there is no maximum limit of participants!
2. Set up your online payments
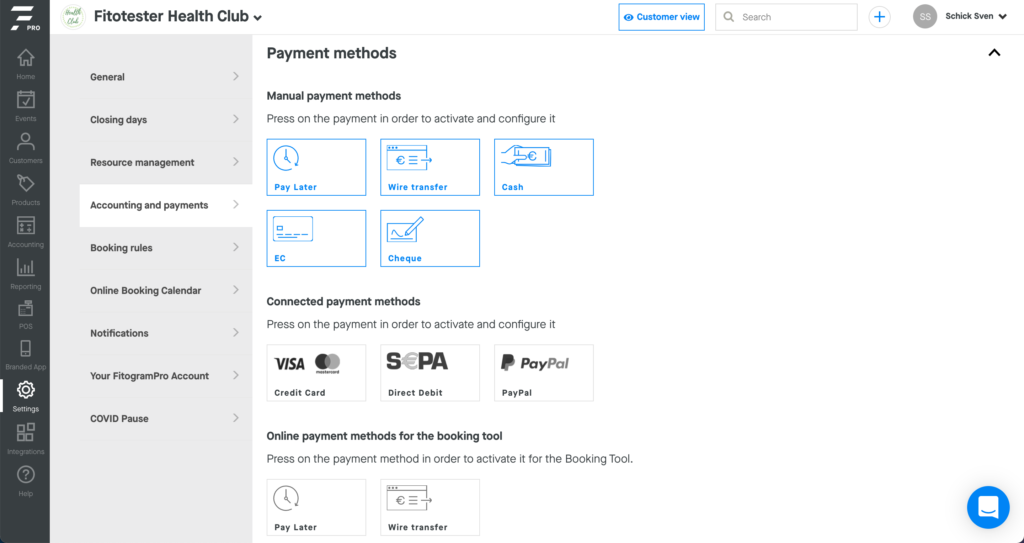
If you have not yet activated your online payments, you should definitely do so for your online classes. In the settings under Accounting you can select the automated payment methods that your customers could use to pay for your class. Whether credit card or PayPal, you can choose whatever is most convenient for you and your business.
Your customers will be automatically guided through the purchase process. To avoid confusion, you may also add a note in the event description that only online payments will be accepted for this event.
3. Share your online class
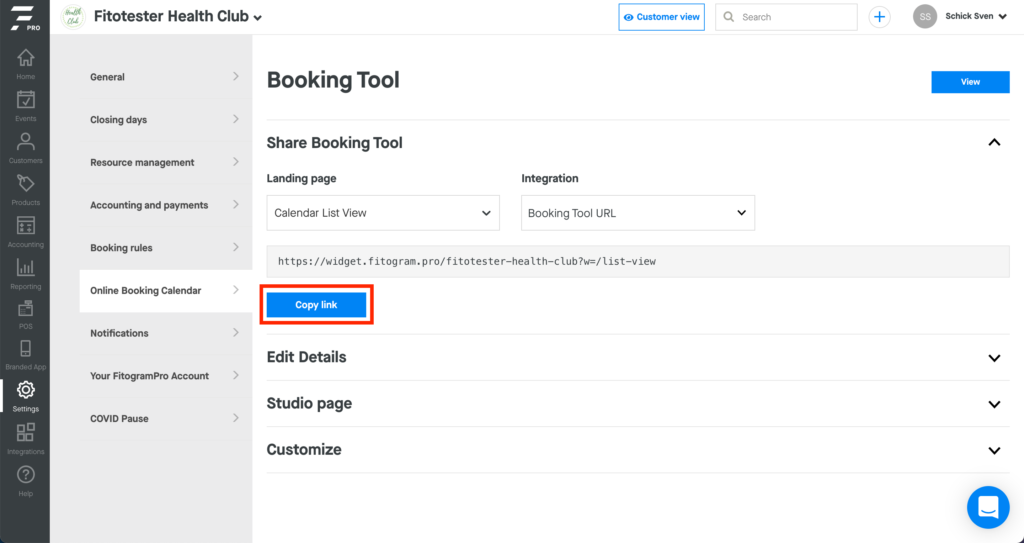
To share your online class, it’s best to use our online booking tool. Thanks to direct syncing, the events you’ve recently created will also appear in your booking tool. Whether on your website or on social media, your customers can access your calendar from anywhere and directly book the online class you’ve created.
If you have not yet shared your booking tool, you can find the link or code in the settings under Online course calendar. There you can easily create a link and share it on social networks or even integrate your calendar on your website. Take advantage of the many opportunities to promote your online classes and attract even more new customers.
Now that the class is available online, nothing stands in the way of bookings!
4. Create an online class with a streaming service
Now it’s time to choose the service you will use to stream your class. There are so many providers online – you are free to research and choose the one that suits your needs best.
We have found Skype and Zoom to be the best and easiest to use and we have prepared short instructions on how to set them up. We will update this post as soon as we find other streaming services that may be helpful in this process. If you are interested in using Skype or Zoom, click below to see detailed instructions on the setup:
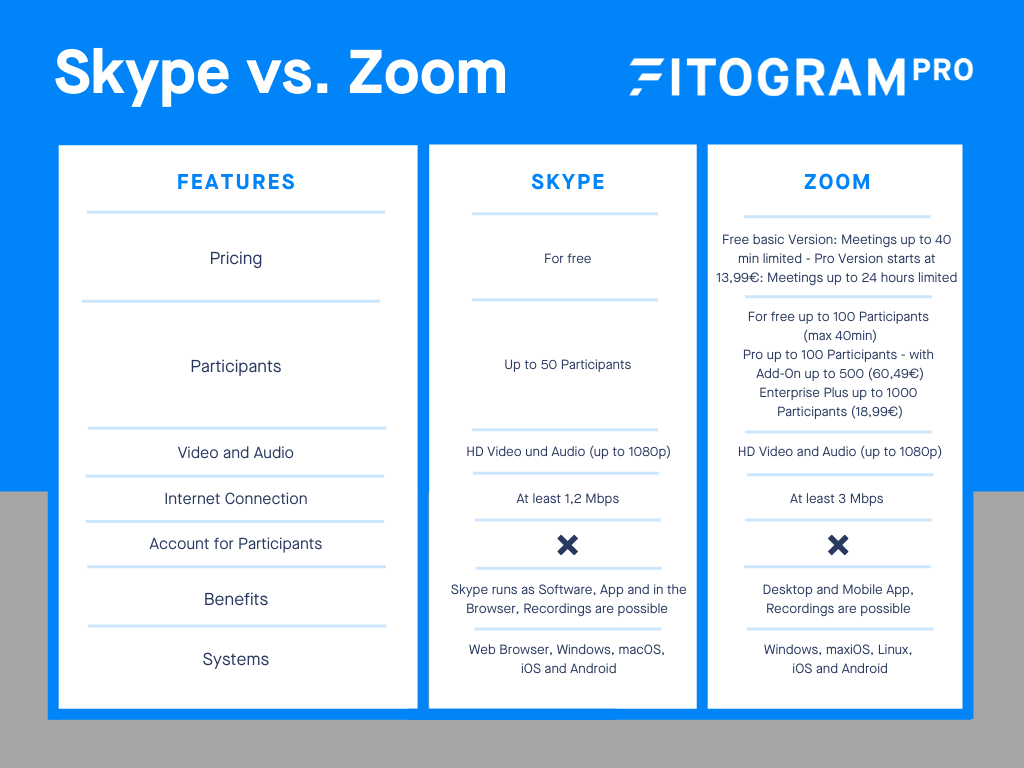
Still not sure which streaming service would be the best for you? We have prepared a short comparison of Skype and Zoom to help you with your decision:
If you decide to use Zoom as your streaming service, we have good news: FitogramPro offers a Zoom integration that actively helps you manage your online classes.
The Zoom integration links your Zoom account to your FitogramPro account. Once Zoom integration is enabled for an event, Zoom links are automatically created for all events in the next 42 hours and automatically sent to your participants 15 minutes before the class. This will save you valuable time for preparation and planning!
You want to use the Zoom integration? Great, then you can skip the next point and go directly to the choice of your equipment.
5. Who has participated and who has paid?
After you have taken care of your streaming service, you can now think about how you want to send your customers the link to your stream. You have two options in FitogramPro. We clearly recommend the second one!
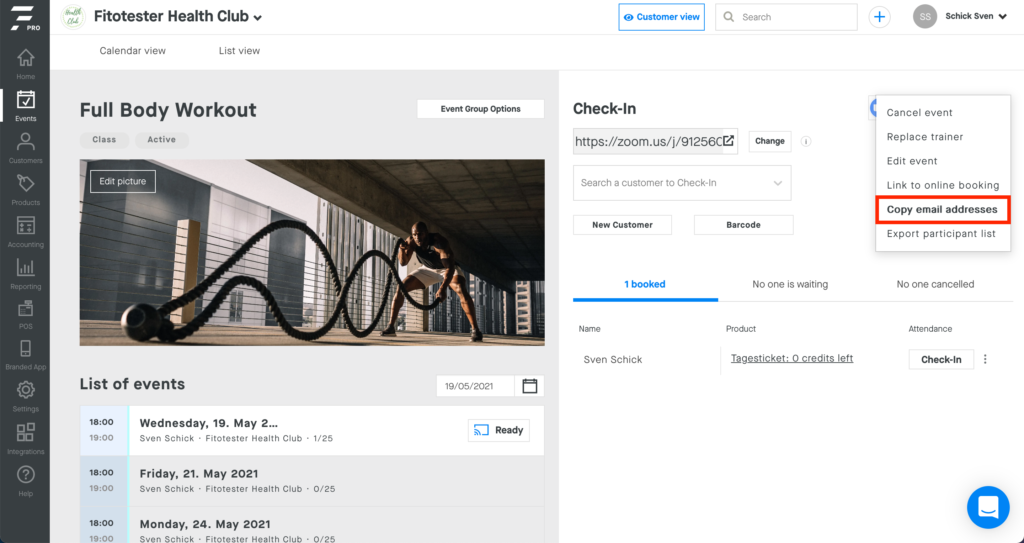
1. First, go to the events section in FitogramPro and select your online class. There, you will immediately see a list of all booked participants and indicator whether they have paid.
By clicking on “Options” you can choose “Copy email addresses”. The email addresses of all participants who have booked your classes will be saved. You can directly copy them into the mail you send later with the link to your class or put them in a separate table so save them. But first, you need the link to your streaming! Please make sure to send a blind copy to your participants, otherwise all mail addresses will be visible to each participants.
2. Share your streaming link automatically with all participants. You don’t have to send the link to your customers manually – we have added a new functionality that will share your streaming link with booked participants 15 minutes before the class starts.
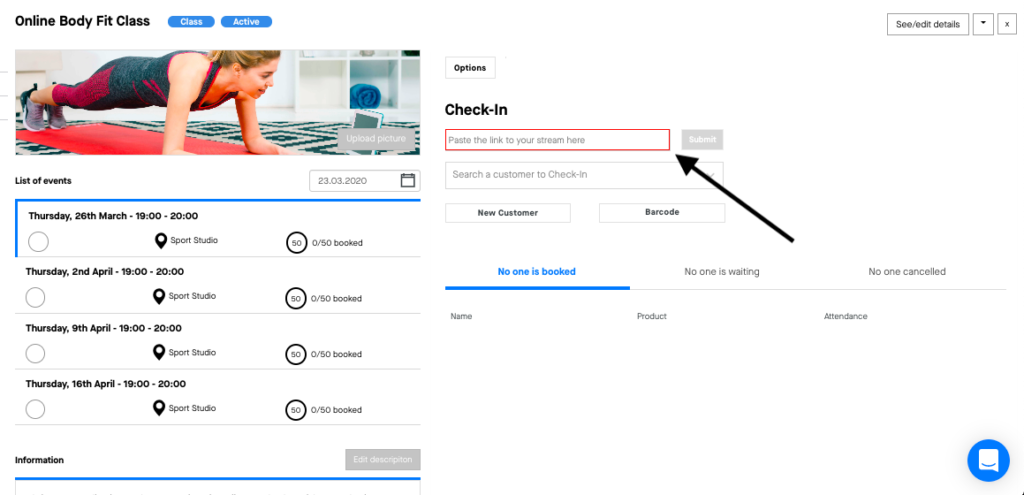
Remember: Insert the streaming link in the check-in area of the event at least 30 minutes before the start of the online class. This link will be automatically sent to your customers by email. They can also dial into your live stream via your online course calendar. Read more in this article.
6. Equipment for your online class
Make sure the quality of your video is excellent. The most important aspect of successful live streaming is a stable internet connection.
Also, you should test and decide whether you want to use your computer’s webcam and microphone, or if you need additional equipment. We recommend using an additional camera and microphone so that your customers can see and hear you well.
Read our tips for online studio and learn what else is important for your online classes.
7. Run your online class
At this point you just do what you do best, give a class. At first, this can be a little weird for you, but with our tips for successful online classes, you’ll quickly learn how to handle the specifics of online teaching.
During the class, you should make sure that the Internet connection remains stable. Furthermore, you should always keep in mind that your customers perform the exercises at home and therefore usually do not have any additional equipment for exercises. You should also make sure that you set up exercises in a simple step-by-step manner, so that they are easy for everyone to understand. And don’t forget to take care of a proper music background for your online classes.
8. Mark your customers as present
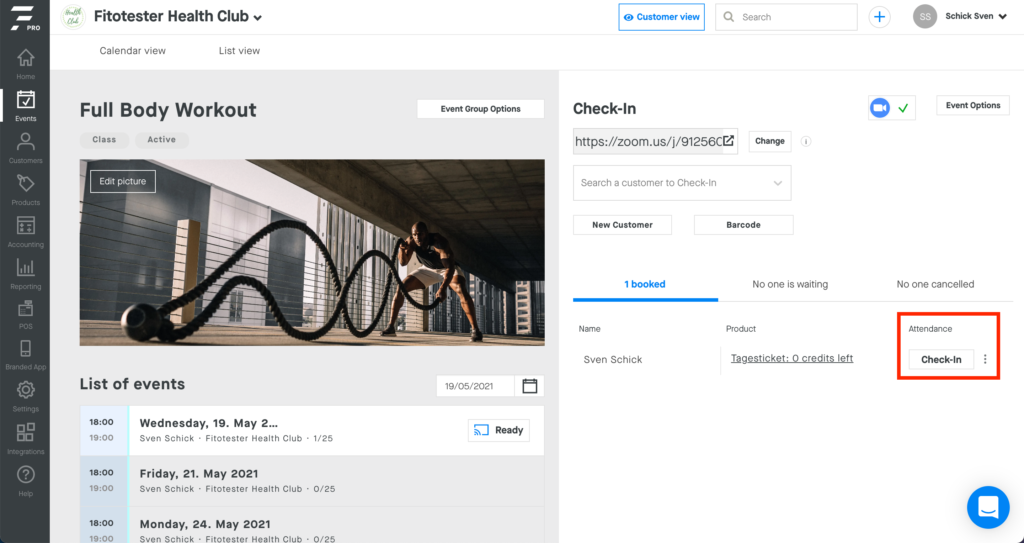
After holding your online class, you should mark your customers as present in FitogramPro. Go back to the calendar section, click on the event you have just held. You will be able to see the list of the people who booked your online class and the details of the product that they bought. If they have booked the class through Urban Sports Club, this will be indicated.
You now have to compare the list of attendees of the online event to the ones in FitogramPro. Click on check-in and you are good to go! The presence has been successfully registered.
If you are already an Urban Sports Club partner, you do not have to worry about managing the bookings – thanks to the native integration between FitogramPro and Urban Sports Club, you will receive the bookings directly in the dashboard.
Such an integration will allow you to activate the increasingly popular instant booking button. Some of its benefits are:
- – An Urban Sports Club user can book only if there are still seats available
- – You do not have to waste time to confirm the availability by phone
- – You will see directly in the dashboard which customer books with Urban Sports Club membership
When you send out the link via FitogramPro as an Urban Sports Club users your customers will be checked in automatically once they have clicked on the link.
Blog image: Designed by Freepik
Read our ultimate guide for a
successful online studio
More from Fitogram:

Your starter guide for outdoor fitness and yoga classes
In this starter guide, we discuss the unique features of outdoor fitness and yoga and share important tips on managing and marketing outdoor classes.

How to start a successful online studio
Digital technologies make starting a business much easier. Most types of trainers, incl. fitness, yoga and others, can start their own online studio in just 30 minutes.

The ultimate guide for a successful online studio
Do you have a passion for yoga, enjoy dancing or want to help others to get fit? Now it’s easier than ever to start your own online studio.

Your starter guide for outdoor fitness and yoga classes
In this starter guide, we discuss the unique features of outdoor fitness and yoga and share important tips on managing and marketing outdoor classes.

How to start a successful online studio
Digital technologies make starting a business much easier. Most types of trainers, incl. fitness, yoga and others, can start their own online studio in just 30 minutes.

The ultimate guide for a successful online studio
Do you have a passion for yoga, enjoy dancing or want to help others to get fit? Now it’s easier than ever to start your own online studio.